How to Use the Mixer Command in Minecraft
This Minecraft tutorial explains how to use the /mixer command with screenshots and step-by-step instructions.
You can add Mixer Interactivity to your Minecraft game using the /mixer command in Minecraft. Let's explore how to use this cheat (game command).
TIP: The /mixer command has been removed in the latest version of Minecraft!
Supported Platforms
The /mixer command is available in the following versions of Minecraft:
| Platform | Supported (Version*) |
|---|
 Java Edition (PC/Mac) Java Edition (PC/Mac) | No |
 Pocket Edition (PE) Pocket Edition (PE) | Yes (1.2.5), but removed in (1.16.210) |
 Xbox 360 Xbox 360 | No |
 Xbox One Xbox One | Yes (1.2.5), but removed in (1.16.210) |
 PS3 PS3 | No |
 PS4 PS4 | Yes (1.14.0), but removed in (1.16.210) |
 Wii U Wii U | No |
 Nintendo Switch Nintendo Switch | Yes (1.5.0), but removed in (1.16.210) |
 Windows 10 Edition Windows 10 Edition | Yes (1.2.5), but removed in (1.16.210) |
 Education Edition Education Edition | No |
* The version that it was added or removed, if applicable.
NOTE: Pocket Edition (PE), Xbox One, PS4, Nintendo Switch, and Windows 10 Edition are now called Bedrock Edition. We will continue to show them individually for version history.
Requirements
To run game commands in Minecraft, you have to turn cheats on in your world.
Mixer Command
- PE
- Xbox
- PS
- Nintendo
- Win10
Mixer Command in Minecraft Pocket Edition (PE)
In Minecraft Pocket Edition (PE), there are different syntaxes depending on what you want to do.
To start the Mixer Interactivity and enable a Mixer api project:
/mixer start <version> <shareCode>
To change to a different scene (ie: each scene can have a different set of buttons) in the Mixer api project:
/mixer scene <sceneName>
To stop the Mixer Interactivity:
/mixer stop
Definitions
- version is the Version ID of the Mixer api project that you wish to enable.
- shareCode is the Share Code of the Mixer api project that you wish to enable.
- sceneName is the name of the scene that you wish to change to in the Mixer. When you start the Mixer, you will always start with the default scene. You can change to a different scene which will display a different set of buttons in the Mixer.
Mixer Command in Minecraft Xbox One Edition
In Minecraft Xbox One Edition, there are different syntaxes depending on what you want to do.
To start the Mixer Interactivity and enable a Mixer api project:
/mixer start <version> <shareCode>
To change to a different scene (ie: each scene can have a different set of buttons) in the Mixer api project:
/mixer scene <sceneName>
To stop the Mixer Interactivity:
/mixer stop
Definitions
- version is the Version ID of the Mixer api project that you wish to enable.
- shareCode is the Share Code of the Mixer api project that you wish to enable.
- sceneName is the name of the scene that you wish to change to in the Mixer. When you start the Mixer, you will always start with the default scene. You can change to a different scene which will display a different set of buttons in the Mixer.
Mixer Command in Minecraft PS4 Edition
In Minecraft PS4 Edition, there are different syntaxes depending on what you want to do.
To start the Mixer Interactivity and enable a Mixer api project:
/mixer start <version> <shareCode>
To change to a different scene (ie: each scene can have a different set of buttons) in the Mixer api project:
/mixer scene <sceneName>
To stop the Mixer Interactivity:
/mixer stop
Definitions
- version is the Version ID of the Mixer api project that you wish to enable.
- shareCode is the Share Code of the Mixer api project that you wish to enable.
- sceneName is the name of the scene that you wish to change to in the Mixer. When you start the Mixer, you will always start with the default scene. You can change to a different scene which will display a different set of buttons in the Mixer.
Mixer Command in Minecraft Nintendo Switch Edition
In Minecraft Nintendo Switch Edition, there are different syntaxes depending on what you want to do.
To start the Mixer Interactivity and enable a Mixer api project:
/mixer start <version> <shareCode>
To change to a different scene (ie: each scene can have a different set of buttons) in the Mixer api project:
/mixer scene <sceneName>
To stop the Mixer Interactivity:
/mixer stop
Definitions
- version is the Version ID of the Mixer api project that you wish to enable.
- shareCode is the Share Code of the Mixer api project that you wish to enable.
- sceneName is the name of the scene that you wish to change to in the Mixer. When you start the Mixer, you will always start with the default scene. You can change to a different scene which will display a different set of buttons in the Mixer.
Mixer Command in Minecraft Windows 10 Edition
In Minecraft Windows 10 Edition, there are different syntaxes depending on what you want to do.
To start the Mixer Interactivity and enable a Mixer api project:
/mixer start <version> <shareCode>
To change to a different scene (ie: each scene can have a different set of buttons) in the Mixer api project:
/mixer scene <sceneName>
To stop the Mixer Interactivity:
/mixer stop
Definitions
- version is the Version ID of the Mixer api project that you wish to enable.
- shareCode is the Share Code of the Mixer api project that you wish to enable.
- sceneName is the name of the scene that you wish to change to in the Mixer. When you start the Mixer, you will always start with the default scene. You can change to a different scene which will display a different set of buttons in the Mixer.
Examples
- PE
- Xbox
- PS
- Nintendo
- Win10
Example in Pocket Edition (PE)
To start the Mixer Interactivity and enable a Mixer api project with the version=987654 and shareCode=a1b234cd:
/mixer start 987654 a1b234cd
To change the Mixer to the scene called DigMinecraftScene1:
/mixer scene DigMinecraftScene1
To stop the Mixer Interactivity:
/mixer stop
Example in Xbox One Edition
To start the Mixer Interactivity and enable a Mixer api project with the version=555555 and shareCode=d5a789aa:
/mixer start 555555 d5a789aa
To change the Mixer to the scene called Axe2GrindScene2:
/mixer scene Axe2GrindScene2
To stop the Mixer Interactivity:
/mixer stop
Example in PS4 Edition
To start the Mixer Interactivity and enable a Mixer api project with the version=123456 and shareCode=e5a123bb:
/mixer start 123456 e5a123bb
To change the Mixer to the scene called DigMinecraftScene1:
/mixer scene DigMinecraftScene1
To stop the Mixer Interactivity:
/mixer stop
Example in Nintendo Switch Edition
To start the Mixer Interactivity and enable a Mixer api project with the version=787878 and shareCode=g1b234fs:
/mixer start 787878 g1b234fs
To change the Mixer to the scene called TheExcavatorScene5:
/mixer scene TheExcavatorScene5
To stop the Mixer Interactivity:
/mixer stop
Example in Windows 10 Edition
To start the Mixer Interactivity and enable a Mixer api project with the version=123456 and shareCode=z9y876wv:
/mixer start 123456 z9y876wv
To change the Mixer to the scene called DigMinecraftScene2:
/mixer scene DigMinecraftScene2
To stop the Mixer Interactivity:
/mixer stop
TIP: The commands above use fictious values for version, scene and shareCode for demonstration purposes.
How to Enter the Command
1. Open the Chat Window
The easiest way to run a command in Minecraft is within the chat window. The game control to open the chat window depends on the version of Minecraft:
- For Pocket Edition (PE), tap on the chat button
 at the top of the screen.
- For Xbox One, press the D-Pad (right)
 on the controller.
- For PS4, press the D-Pad (right) on the controller.
- For Nintendo Switch, press the right arrow button
 on the controller.
- For Windows 10 Edition, press the T key to open the chat window.
2. Type the Command
We will cover examples of how to use the /mixer command to start the Mixer Interactivity, change the scene and stop the Mixer Interactivity.
TIP: You need to be singed into a valid, non-guest Xbox Live account to enable Mixer Interactivity.
Start the Mixer Interactivity
Let's start by showing how to enable the Mixer Interactivity. For example, let's enable the Mixer api project that has version=987654 and shareCode=a1b234cd with the following command:
/mixer start 987654 a1b234cd
Type the command in the chat window. As you are typing, you will see the command appear in the lower left corner of the game window. Press the Enter key to run the command.
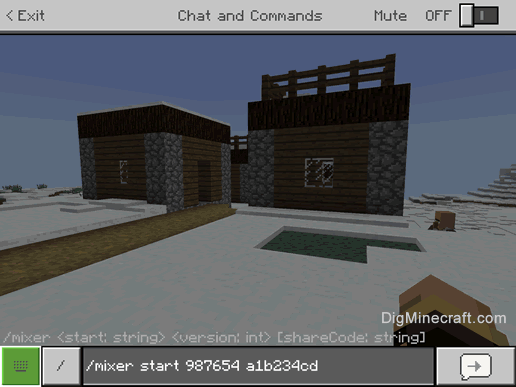
Once the command has been entered, you will see the message "Interactivity is enabled" appear in the game window. In this example, we have enabled the Mixer Interactivity and enabled the Mixer api project that is identified by version=987654 and shareCode=a1b234cd.
Change the Scene in Mixer Interactivity
Next, let's show how to change the scene in the Mixer Interactivity. For example, let's change to the scene called DigMinecraftScene1 with the following command:
/mixer scene DigMinecraftScene1
Type the command in the chat window and press the Enter key to run the command.
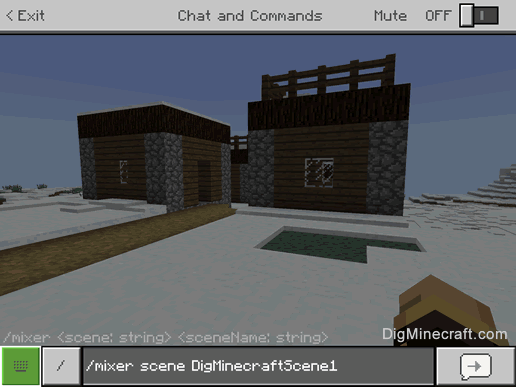
Once the command has been entered, the Mixer will change to the scene called DigMinecraftScene1 and the set of buttons associated with this scene will appear in the Mixer.
Stop the Mixer Interactivity
Finally, let's show how to stop the Mixer Interactivity with the following command:
/mixer stop
Type the command in the chat window and press the Enter key to run the command.
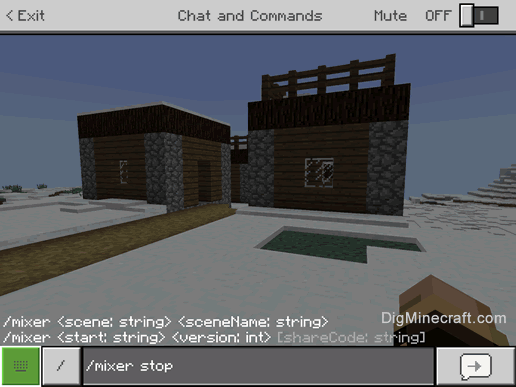
Once the command has been entered, you will see the message "Interactivity is disabled" appear in the game window. Now you the Mixer Interactivity will be stopped and you will need to restart it again to use the Mixer.
Congratulations, you have learned how to use the /mixer command in Minecraft.